Showing posts with label MotHer's DaY. Show all posts

Thursday, May 20, 2010

Moms and Muffins

We held our "Moms & Muffins" breakfast this past weekend for the Activity Day girls.
It was lots of fun and I think everyone had a good time (I never really know...preteens are hard to read...almost as bad as their teenaged friends).  We did have a good turn out, everyone came in fancy hats as was requested.  The party was meant to have a tea party theme.  So we had breakfast with our moms (muffins, obviously), gave awards for their decked out tea party hats, and then took pictures of the girls with their moms.
And now I can say...one more down.

Anyway thought I would share a few pics of the decorations.
First, here's the invite I made up in Photoshop.


I know! 8:00 in the A.M.! 
That's so early for me to up and functioning correctly.  But schedules had to be worked around.  Busy girls.
Here's a bit of an overview of the tables.


And a little bit closer in on the details.


I used a lot of decorations from around the house (cheap) but did have to fluff it up a bit further.  I made pink pOm PoMs (already had the blue and green) and strung a few paper doilies, then made a few of the rosette balls (above)...and there you have it, ready for a party.


Wednesday, April 28, 2010

More for Mom

As promised here is a bit more for Mom. 
Along with the flowers we made for our mom's, my Activity Day girls are going to 'make' a jar of bath salts.   Homemade bathsalts was my intention in the begining. I wanted to make them from scratch using Martha's recipe...
You need only four ingredients to make these moisturizing exfoliants. The base can be made from either Epsom salts or sugar, depending on whether you want a large or fine grain. Color the scrubs with shades that are in keeping with some of the scents you use -- pink with grapefruit, for example, or green with eucalyptus. Makes about 2 1/3 cups.

Tools and Materials:

2 cups Epsom salts or organic cane sugar

1 cup carrier oil

8 drops essential oil(s)

1 drop food coloring

Special equipment: plastic pipette, canning jars


Great idea, huh?  Yes, but then I went to look for all the supplies and ended up not finding everything I needed and realized that it was probably cheaper to buy it done for us already in a big bag like this...
Edited to add:  I found these at Walmart


All we need to do is add some food coloring to add a touch of color,


Top with our flowers and we're done.


Don't know if I can qualify that as a whole activity...but I figure it will leave us time to write a nice letter to our mom's that we can attach to our almost homemade bath salts :) 
It's the thought that counts, right?

Tuesday, April 20, 2010

a littLe somethin' for MoM


I've been making more flowers...I can't give it up.  
Actually, I was in need of a quick, easy (and not to mention, cheap) project for my Activity Day girls to do this month and decided that it should probably be something for the Moms...seeing as, Mother's Day is just around the corner.  So of course, the flower was the obvious choice.  What mom wouldn't want a nice flower to wear on her special day? 
Now, if you're thinking "I would love to have a flower to wear on Mother's Day!"  Guess what...I'm giving a few away.  In honor of Mothers Day, my 75th post and my 50 followers (it's something)...I will be giving away 3 flower pins.  All you have to do is leave a comment, tell me you're a mom (or that you have one) and I'll pick 3 winners this week on Thursday.

GIVE AWAY NOW CLOSED!

...But if you'd rather make one on your own, here's a tutorial on how I made mine...I know, I'm feeling generous...don't get used to it :)


First the supplies you will need:


  •  one full piece of the precut felt

  •  a button (any will do)

  •  hot glue gun

  •  a pin (or hair clip would be fun, too!)


I started by finding a cup in my cupboard to use as my template to trace circles on my felt (about 3 inches round).  Then I traced.  You'll need 6 circles per flower for the petals and then one smaller circle for the base of the flower. 


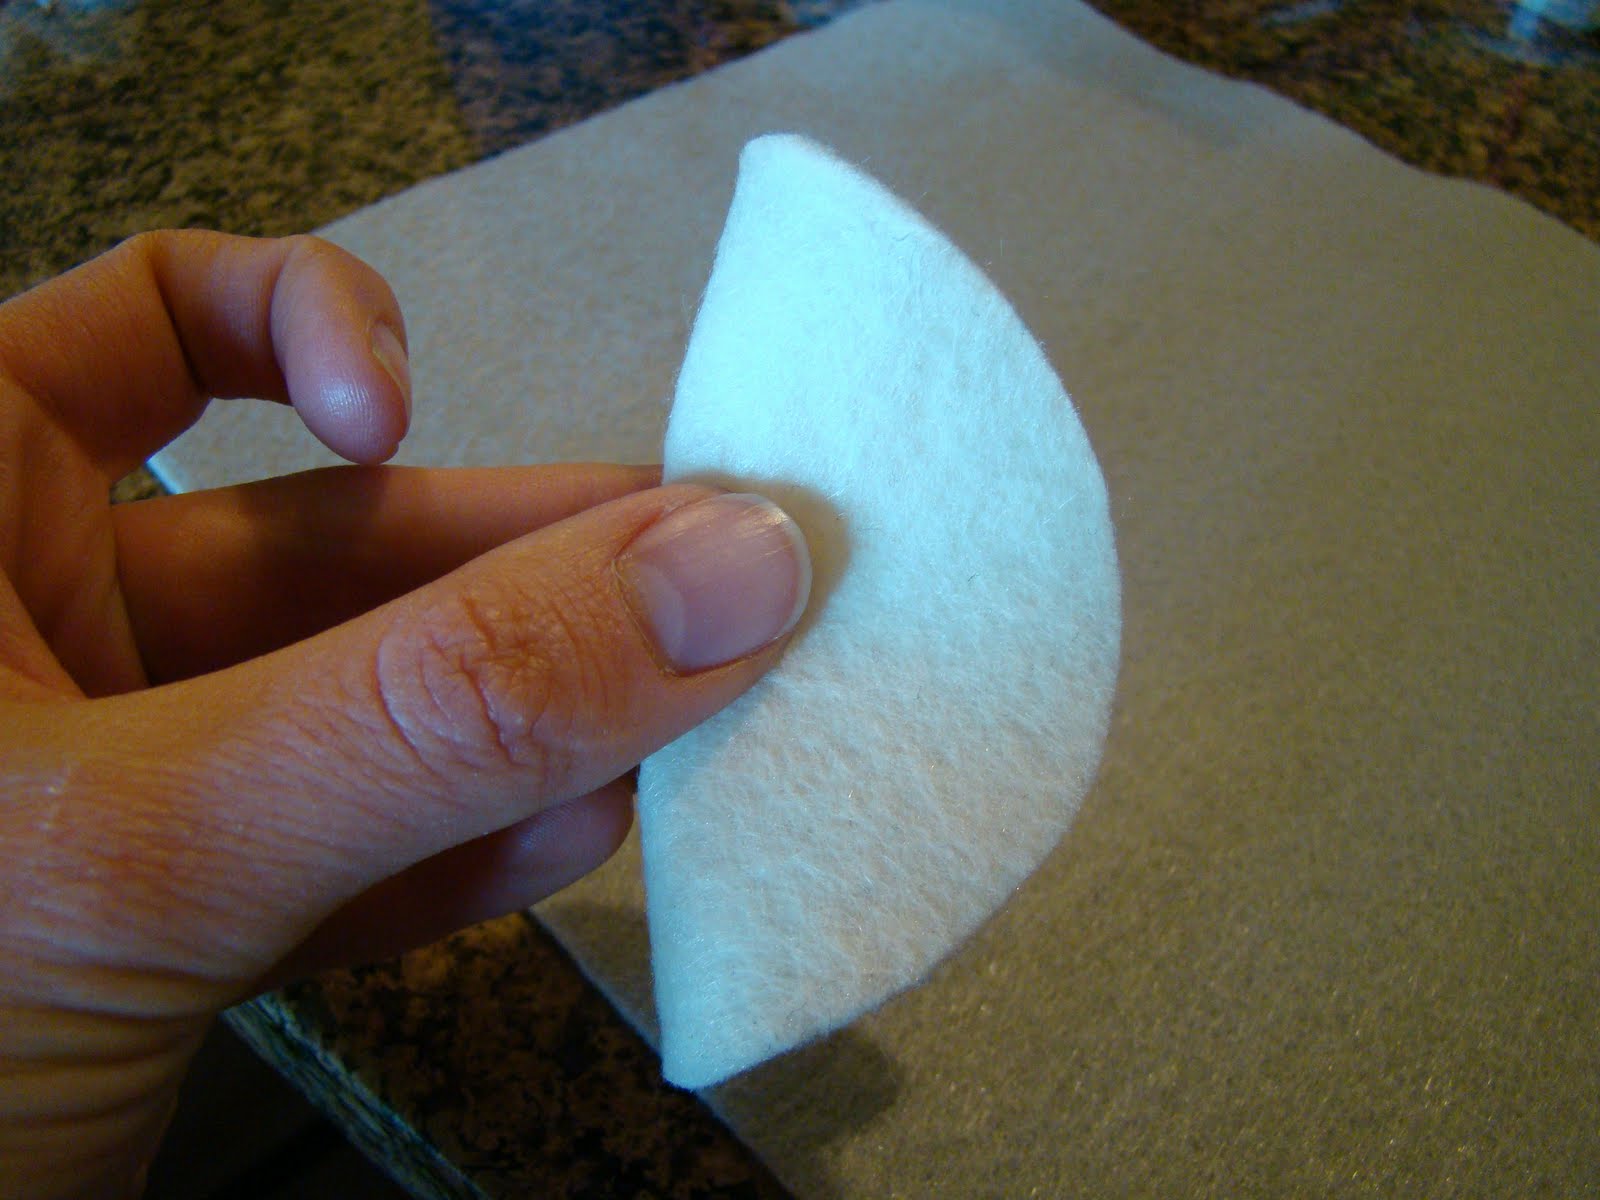
Once you get them all cut out, take your circle and fold it in half.


Then fold one corner up to make a triangle.


Then fold the other corner back to make an 'S'...something like this...


You'll need to put a dab of glue at the pointy ends on each side to hold your 'S' in place. 
Next you will start glueing your 'triangles' to your base, one at a time, making sure to center them on the base.  Also, make sure you squeeze them nice and close together so that there aren't gaps inbetween you petals.


Once you get them all on there fluff up the petals and they should look something like this...


Not bad, ehh?  But to dress them up just a bit further, glue a button right in the center.  I used fabric covered buttons (you can find kits at any craft store).  You can also cut some leaves from felt and glue them to the back it you'd like, but they're cute enough on their own to just leave them if you prefer.

Last I just glued a pin back on.


And there you have it.  You've got one fun, fashonable, felt flower.  Fabulous.


We are going to make another small craft for our mom's in the next couple of weeks (more on that to come) and these flowers will be perfect to finish off the packaging...serving a dual purpose.