Showing posts with label BabY StuFf. Show all posts

Friday, April 1, 2011

YOU Can Make a QuiLt...I have proof.


I have wanted to attempt the quilt for quite some time now, but had absolutely no idea where to begin with one.  Really, no idea.  I was scared.  So I put it off.  Over and over again.  But with a new little one coming I was feeling inspired to give it a go...somehow.  I've come to learn that the Internet can 'teach' you to do pretty much anything.  So I logged on and I searched and searched until I finally came across this, a beginning quilting series from Diary of a Quilter...she made me believe.  She's got ALL the steps spelled out for you in black and white, from what supplies to start with all the way to binding your quilt...and she's so easy to follow!  I was actually excited to get going!

So I went through my scraps...I didn't want to go out and purchase a bunch of fabric, just in case things went amiss.  I knew I wanted to use different textures and patterns since I would be using this as a little tummy time mat for baby.  So I got creative and pulled out some knit, minky, and even a ruffled pillow sham that I had left over from the nursery pillows.


I cut the back off the sham...


Then cut my squares with my rotary cutter...I used 5 inch squares.


Then it was time to lay out my squares in the pattern I thought worked.


Then following the instructions from Diary of a Quilter I started piecing my quilt and made rows with my squares...


And ironed my seams...the iron will become your very best friend during this project!


Next I sewed my rows together.


And it started to look like something that resembled an actual quilt.  I added my borders and batting and backing and really started to get excited because there were now layers to my quilt.  But the excitement came to a screeching halt when I learned that I had to baste my quilt.  Huh!?  I had never heard of such a thing!  Who knew this step existed?  And that there was spray and special basting pins involved.  Well, I was on a roll and wasn't about to throw in the towel at this point, so even with being ill prepared and without proper equipment...I rolled on, with regular old safety pins.  And I'll tell you, they worked just fine. 


Okay, so this is where I started to get a little nervous.  It was time to actually quilt...that is to say, SeW.  Preferably in straight lines.  And because I was a little lazy (and really anxious to finish) I totally skipped a step and didn't draw lines to mark where to sew...such a rebel.  I just eyeballed my way through, and do you know, some of the lines actually lined up!


So at this point I am jumping up and down that I might actually see this thing through.  All there was left to do was finish with a little binding.  So I cut my strips and pinned...


And I FINISHED that quilt!


So there it is...PrOof.
Because if I can do it, YOU certainly can too!


Thursday, March 31, 2011

Something for babY


For those of you who don't know, I'm getting ready to welcome my 3rd baby (first girL) in just about...well, any day now.  So as you can imagine there has been a lot of BabY on the BraIn as of late.  Especially once I realized (about a week ago) that I have not 'made' anything for her yet.  I also realized (about a week ago) that I was a little short in the blanket department...unless you count all the blue ones packed away in storage.  So in this instance what would any rational 9 month pregnant woman do...take herself to the local Target to purchase a few...probably.  But I'm a different kind of crazy and decided I would still try to make some instead.  So that I did. 


I found the fabric at Hobby Lobby.  Love it.  Also love the so very cozy minky...but must say it's a beast to sew!


I wanted to add a little something extra and turned this once felt flower Easter garland (also Hobby Lobby) into a little embellishment.


I probably should have prefaced this post by saying (and I know I've said it before...many times) I don't sew.  Never have had a lesson (unless you count me sitting on my grandma's lap at the age of 7 'helping' her sew up a few pillowcases).  I don't know the terms, don't know how to use a pattern, I'm really not quite sure if I even thread my sewing machine correctly...I'm totally winging it!  But nevertheless.  I don't think baby's even gonna notice.  What she will remember (hopefully) is that the blanket that she dragged around for years and years when she was little was made with love...crooked lines and all. 


Now call me cocky, but I finished the blanket and just couldn't stop myself.  I still had a bit of fabric left so I made a few burpies to match... which, by the way, turned out to be trickier than the blanket for what ever reason?!  It's a learning process...one that I may or may not ever tackle.


So the moral of the story for today is...go for it!  Try something new.  Something you might not have clue how to begin.  Make some mistakes.  Then try it again.  So what if the lines aren't 'PerfeCt'. That doesn't stop me.  And it shouldn't stop you either!

Stay tuned for my next installment...'CraZy Pregnant Lady That Doesn't Sew Makes a QuiLt'.  Ha!  Just the thoughts of it makes me laugh!!


Monday, March 7, 2011

the Nursery


Okay here it is, for those that have been waiting...if there really were any of you out there...the BiG reveal.  Can I say I'm feeling a little nervous and a bit of pressure!?  First let me disclose that the room is still in a state of being 'sort of finished'.  But really, is the decorating ever completely FINISHED...not around here.  There are a few things I would like to try and include before baby comes, like a rocker of some sort and maybe a chandelier...if I ever find what I'm looking for (if you have ideas where to find either, please do share!!).  But for now it is as done as it's going to get.


The main project of this room was the board and batten treatment we did on the walls.  Initially getting the boards on the wall went pretty quick and without too much trouble.  We, like many others of you who have board and battened, went to the Home Depot and had the MDF cut...relieving much of the time and work that could have been spent.  After that we spent one weekend gluing, nailing, and painting.  If it weren't for the custom made trim and the finish work we could have had it all finished up in one whirlwind of a weekend.  Unfortunately making your own trim from scratch (couldn't find precut trim that I liked) and puttying and sanding then not liking the results and having to reputty and resand (3 or more times!) does take some time to accomplish.  Needless to say, it did get done and I LOVE the results.
I should probably take a moment here to mention that I really had little (okay, nothing) to do with all the labor that was involved in the making of this room.  That credit all goes to the hubs and my dad who put up with me and my 'ideas' through the entire project.

Okay, so on with the tour...
The paint color I chose for the upper wall is Glass Tile by Valspar.  Yes it is a bluish color.  And yes it is a little girl's nursery.  The one thing that my dad voiced his opinion on.  But you can see how much I listened...


The birdie canvas is from Pier 1 Imports and lamps I moved from another room (I found them at Hobby Lobby a few years ago).

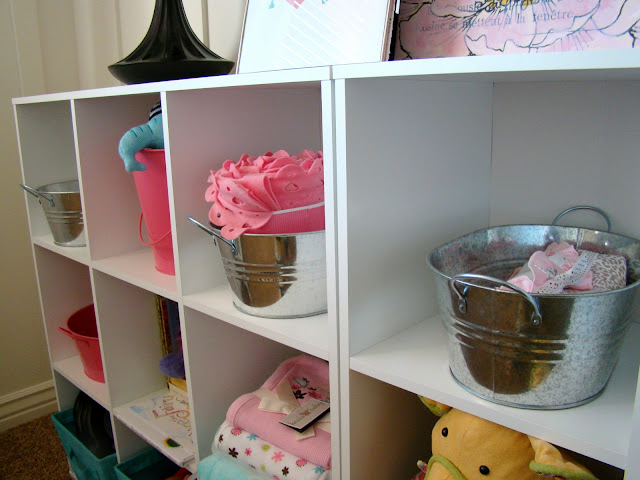
I've been collecting different containers and buckets over the last few from all over to put on the cube shelves.  Most of these buckets are from Target's dollar spot and the canvas bins I found at Walmart.


I made these create paper balls last year for another project.  Thought they fit in the room nicely.


Because there is a lot of different patterns going on in the room with the bedding and different fabrics I couldn't decide what I wanted to do for curtains and finally ended up with plain old white panels...er, sheets.  That's right, $4.00 Walmart flat sheets.  Add a few curtain hooks and little fluff...you have very inexpensive drapes.  And later on if I find something I like better I won't feel guilty about spending the $. 


The furniture is all recycled from the basement and has already survived two little boys.  I did, though, add a little fabric to the fronts of the drawers (just stapled it right on there) and added new knobs from Hobby Lobby to fancy up the dresser/changing table.


I've already mentioned the deal I got on the bedding once before...but for those who missed...I found the bumper pad and bed skirt for $8.00 a piece on clearance at Target a while back.  Then I made a few pillows to coordinate and tie in all the colors of the room.


I used some of the same fabrics from the pillows to make a pennant banner...I can't get over these!


The chandi art I found at Real Deals.


Can't get over the pom poms either...made these from tissue paper.


This little table used to be navy blue.  Looks much better covered in Glass Tile I must say.  I'm thinking she needs a cute little lamp to go up top.


I borrowed the zebra rug from the playroom (originally from Walmart).  Still trying to decide if I like it in the room or not.


And there ya have it...all ready for a baby, preferably a girl one.
Now that it's done I can focus on the less important things, like finding a car seat and other basics that have yet to be purchased...in my world decorating comes before the essentials.  Priorities.